How To Install the New Q-Nut Cover
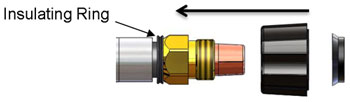
- Install Insulating Ring over the back of the Q-Nut and into the space between the aluminum armor and the front face of the Q-Nut. Removing front end consumables allows installation over front of neck if desired.
![How To Install the New Q-Nut Cover, step 1](https://sp-ao.shortpixel.ai/client/to_webp,q_glossy,ret_img,w_350,h_102/https://www.tregaskiss.com/wp-content/uploads/2020/07/q_nut_cover_1.jpg)
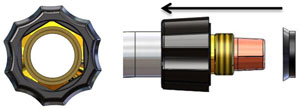
- Line up the middle of the tall arch on the Q-Nut Cover with the corner of the hex on the Q-Nut and slide the Q-Nut Cover forward until the part bottoms out. When installed properly, there should be an approximate 1/16” gap between the rear face of the Q-Nut Cover and the threads on the Q-Nut.
![How To Install the New Q-Nut Cover, step 2](https://sp-ao.shortpixel.ai/client/to_webp,q_glossy,ret_img,w_300,h_109/https://www.tregaskiss.com/wp-content/uploads/2020/07/q_nut_cover_2.jpg)
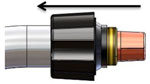
- Slide the Silicone Insulator over the threads of the Q-Nut and press flush up against the rear face of the Q-Nut Cover. Ensure that the Silicone Insulator is orientated in the position shown in the image below.
![How To Install the New Q-Nut Cover, step 3](https://sp-ao.shortpixel.ai/client/to_webp,q_glossy,ret_img,w_209,h_117/https://www.tregaskiss.com/wp-content/uploads/2020/07/q_nut_cover_3.jpg)
Pictorial Glossary
![How To Install the New Q-Nut Cover, Pictorial glossary](https://sp-ao.shortpixel.ai/client/to_webp,q_glossy,ret_img,w_620,h_238/https://www.tregaskiss.com/wp-content/uploads/2020/07/q_nut_pictoral_glossary.jpg)